


 from Spirited Away")
")
")


My kids are obsessed with the characters from the game, Little Nightmares 2. My son loves Mono, a character whose head is covered by a large bag. My daughter loves Six, a girl who wears a hooded yellow raincoat. They begged me to put together something so they could wear these out as cosplays. Who am I to say no?
Knowing that they will grow out of these sooner rather than later, I opted to purchase the cloth goods on Amazon. I was able to find a gray Mono costume in my son’s size, as well as a Six jacket in my daughter’s size. The quality on these wasn’t bad at all!
The Mono suit is a little shiny for my taste, but since the character is supposed to be dirty, we’re going to hit it with some weathering sprays. This should knock down the shine.

Six doesn’t carry any props or accessories, so she’s pretty much completed. Six walks barefoot, but I’m not okay with my daughter walking around without shoes! I bought a pair of nude-colored jazz shoes for her to emulate bare feet, and they work well. Since Mono also walks around barefoot, I bought another pair of nude-colored jazz shoes for my son as well.

Mono has two props: a bag for a hood, and a large key he wears attached to his jacket.

Time to get building!
First, I started with the key. Looking around my Nerd Room, I found a piece of foam pipe insulation. It looked like the right shape for the shape of the key base. The key has two ridge detail areas below the large ring. For the large ring, I cut off two small lengths of the foam pipe and cut them to fit around the main pipe. I attached the large ring to the foam pipe with contact cement.

I cut a small strip of EVA foam to create the smaller ridge detail and glued it to the base with contact cement just above the larger ring.
Next, I cut a section of 1” EVA foam to make the notch detail part at the bottom of the key. I just kind of eyeballed the shape to match the reference photo.

I attached the piece to the pipe with contact cement and then wrapped it all with duct tape to secure it all well.

I realized later that I had attached the bottom part in the wrong orientation! No biggie, I fixed it later.
I was waiting on a foam ring to arrive for the top part of the key, so I moved to making the “bag hood”. This is essentially a box with holes in it, but it’s a little tricky to get it to fit properly to wear as cosplay! To make it comfortable for my son to wear, I cut out a piece of 12x12x1 EVA foam to insert into the box. It initially fit inside the box nice and snug, so we were able to make adjustments for positioning. I cut a hole in the middle for his head to go through slightly. It fits around his head like a hat. Once we got the correct shape and size of the hole, we positioned the EVA foam sheet in the right spot, and tested out the fit. I penciled in the eyes (using a roll of duct tape as my template) so we could make sure everything looked proportional.

I carved out the eye holes. I suppose I could have done a better job making these holes more “perfect”, but at this point, I just wanted to get the hood made!

Then I secured the inner foam part with hot glue from both sides.

Looking again at the box, I realized that the top looked a little too tall compared to the reference image. I decided to make it a bit shorter by cutting down the top. The darker pencil line on the top of the box is where I cut to.

After cutting, here’s the result. It looked much better to me!

End of work for Day One. So far, so good!

I added the foam ring to the key the following day and covered it all with duct tape. I also corrected the orientation of the bottom of the key detail.

I decided to coat it with Modge Podge. I didn’t have any newspaper on hand, so I just used some ripped up paper towels to cover things.
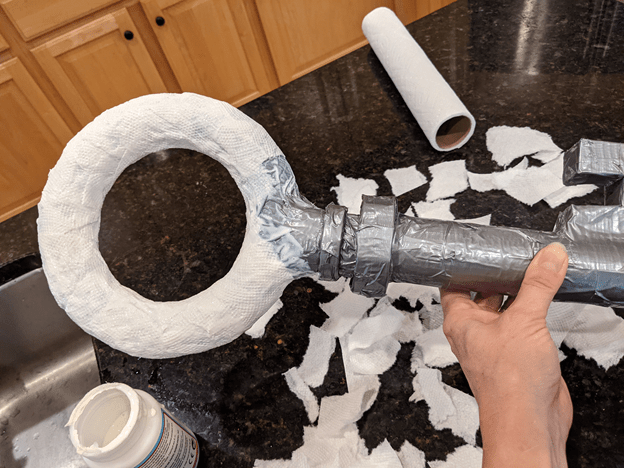

I really didn’t like the texture of the paper towels on the key. So I dashed to the store to find a newspaper and some more Modge Podge! A short while later, I recoated everything with newspaper and a new layer of Modge Podge. Much better result!

While that was left to dry, I tackled wrapping the box to make it look more bag-like. I was paying special attention to the seam lines on the box, namely the orientation of the fold on the top as well as the seams on the left and right sides of the box.


I bought a large roll of craft paper for this. First, I made sure that the box itself was well taped down around the lid flaps. I decided that it would be challenging to get the effect I wanted with just one large sheet of paper. So I wrapped it using two pieces, overlapping at the middle. Those overlaps on the side would serve as the seams that I wanted anyhow!

I taped everything down well where the layers were hidden. For the outer top seams, I used contact cement to adhere the flap from the inside. For the side seams, I inserted a little hot glue inside the seams- just enough to secure the edges.

To cover the eye holes, I cut out two pieces of black speaker cloth and attached them with some hot glue from the inside. This material allows for good visibility while obscuring the person’s eyes from the outside.


I think we’re getting there!
Next up: weathering the box and painting the key!

")
")


